1. Mattress Covers. Egg crate mattress covers are an
economical way to obtain soundproofing and work similarly to acoustic foam.
They can be found at many discount supply stores and often in thrift stores.
They can easily be installed by gluing or stapling them to your walls.
2. Carpeting. The thicker the better! It’s not just
for flooring either. You can attach carpet to your walls or cut strips of
carpeting and attach them to the seams around windows and doors to dampen the
noise coming in from outside. Go to your local flooring company and ask about
purchasing their miscuts.
3. Sound Baffles. These are barriers that stop the
reverberation in a room. Attach sheets or pieces of foam at various points
across your ceiling to reduce airborne sound. They don’t need to touch the
floor to make significant impact and are extra items you likely have around
your home.
There is no shortage of second-hand equipment looking for a
good home. Cut down some of your costs by purchasing gently used recording
studio equipment.
Here’s a few ways you can tell if the equipment is worth the
asking price and will happily meet your needs:
Check physical condition
in the ad: Always
assess the physical condition in the ad or ask the seller to describe the
condition.
Ensure the item is as
described: Check
for scratches, dents, loose items, and quality.
Pay attention to brand
name: It’s
worthwhile to note that brand names the likes of Shure, Neumann, and
Digi002 are high-end, and may command a higher price.
Get an idea of how the
equipment has been used: Ask where the item was purchased, how much it was
purchased for, and when it was purchased.
Knowing these variables will give you the leverage you need
to decide whether the the equipment is priced fairly. You can also request a
copy of the original receipt. Ask for original boxes, warranties, and user
guides.
USB Mics in the old days didn’t record well. New
ones are sufficient for most recording.
Large Diaphragm
20Hz-20Khz
Gain Control
Zero Latency Monitoring (Headphone Jack on Mic)
24 Bit Mic Chipset
Aliso Creek Voice Over Classes: FREE ebook: Your
Voice Over GPS: http://alisocreek.net/voiceover.html
Should you use a USB mic for voice over recording? With the latest in
technology available, the answer may surprise. you!
The most intuitive professional noise suppression
plugin ever created, Waves NS1 Noise Suppressor intelligently
differentiates between dialog and unwanted noise. Perfect for post
production, audio forensics and musical applications alike, NS1 instantly
analyzes and adapts to your signal in real-time, bringing the foreground
into focus as it eliminates unnecessary background noise. Controlled by a
simple single fader, NS1 also features an attenuation meter which shows
you just how much overall energy is being removed from your input signal.
With NS1, noise suppression is as easy as fading away.
Performance
Real People, Guy/Girl Next Door. Natural Voice. No
Announcers. Upbeat. Not Sales. Genuine. Authentic.
Business (Marketing)
You are responsible for Marketing yourself. Don’t
rely on an agent or agency. Market yourself. Create your own brand. Build
a website, get a Demo Reel, etc.
1. Get to Know Your Voice Through Voice Acting Practice
2. Learn and Try the 5 Basic Types of Characters in Voice
Acting Roles
3. Regularly Get Voice Acting Practice with Sample Scripts
Let's explore the roles in detail.
The Instructor
When teaching someone, for example, in a corporate training
video or children's game, the voice over best suited for this kind of project
is a straightforward, educated, and instructional voice. The role of this
particular voice talent is to teach or provide information to fulfill a
specific goal or purpose. Anyone who has had the opportunity to run a class,
guide presentations, or has managed a team will likely find this role
comfortable.
The Real Person
Projects
requiring a more casual approach often benefit from relatable, genuine voice
overs. These are referred to as ‘real person’ voice overs, commonly known as
the ‘regular guy’ or the ‘girl next door.’ This character is homegrown,
sensible, and friendly, with a touch of familiarity, providing a more intimate
interpretation of the script that instills trust.
While
this role may seem like it should suit everyone, it is harder than one might
think to read a script and still sound like you're having a regular
conversation with a friend or loved one.
Former
radio personalities tend to need help in this area because they've worked for
so long in an industry that’s challenged them to change the timbre of their
voices to sound like an announcer (see more about the announcer below).
The Spokesperson
A spokesperson can be on-camera or off-camera, depending on
the medium you are using. The role of a spokesperson is generally played by a
confident, charismatic person able to promote a cause, product, or service with
ease and authority.
A voice over of this nature needs to be driven, optimistic
and assured. If you've ever been in sales, these traits probably sound
familiar. Many people who gravitate to voice overs from sales positions tend to
feel right at home in this role.
The Narrator
Storytelling
is where the Narrator is most at home. Omniscient, unbiased, courteous and
honest, a narrator's job is to provide an audio landscape for a listener,
briefing them on background information, posing questions, and providing
solutions as they guide their audience through a program or documentary.
Narrators can be male or female, and the most important factors are that they
can communicate clearly and engagingly. If people hang on your every word while
listening to you tell a story then this is likely your comfort zone.
The Announcer
The announcer, often heard live at events, on commercials,
promos or introducing segments for radio or podcasts, is a product of the
broadcast age, most celebrated at its height in the Golden Age of Radio and
early television broadcasts. Announcers can introduce an idea and assertively
make a call for action at the conclusion of a commercial advertisement or short
video.
If you were in radio broadcasting and you're now pursuing a
career in voice over, then you may find this voice over character fits you like
a glove.
Character information:
Who is the character? What’s the character’s age, background
and history?
Plot information:
What happened or will happen to the character? Who else is
with them in the scene? Where is the action taking place?
Voice over style and
tone:
How should the character’s voice sound? Is the voice over
role for a child or adult? What are the character’s emotions?
Artistic directions:
Look for artistic directions that let you know more about
the setting, your character’s position, etc. Are certain words meant to be
emphasized? You must carefully read the lines to look for italicized or bold
words and understand what they mean.
The Top 3 Tips for Reading a Voice Acting Script
Stay relaxed:
It is crucial to stay relaxed while reading and performing
with a script. This doesn’t necessarily mean that you should read more slowly,
but rather with a calm and focused mind. This will help you reduce loud
breathing sounds and silly mistakes.
Read the script first:
Needless to say, if you get the script before hand, you
should always go through it a few times before the recording session. This way,
you’ll be familiar with the lines and not miss important stylistic notes
and pauses.
Move freely:
If your recording space allows you to stand and move around
in the booth, that’s excellent. Standing helps you breathe more clearly. It
also helps you get into character and make natural movements while
voice acting.
7 11
So it’s 2:00 in the morning...and you’re starving. Nothin’ in the fridge, and nothin’ in the cupboards. You don’t even have dog biscuits hangin’ around. You think about cooking, but then you remember the 3-alarm fire you started last time you tried using the stove. Well, check out 7-11. There’s gotta be one right near ya’. They have everything from burgers to tacos...24 hours a day...7 days a week. 7-11. Think of it as your own personal walk-in kitchen.
7up
7UP Plus with Calcium. Introducing a whole new kind of soft drink. With real fruit juice, 10% of your daily calcium and only 10 calories in every 8 oz. serving, it tastes so good you can feel it in your bones. For great taste with calcium, the only way to go is UP.
Amp Energy Drink
WHY stop? I think we all know what roses smell like. AMP energy drink from MOUNTAIN DEW.
Product
"Poof" by leawms
Script:
Have you ever noticed what happens when you put in a movie?
It's amazing.
You just stick it in,
Sit back,
Hit play, and...
Poof.
The rest of the world just disappears.
Gone.
Suddenly, it's just you and your family.
You remember them. Your family. Some of them look like you.
At Movie Gallery, we have thousands of great movies. Including your favorite holiday movies plus the latest releases. And every one of them is guaranteed to have the same magical powers.
Movie Gallery.
Play on.
1-800-OK-CABLE
Vibrant colors leap off the screen in vivid rich detail, premium CD quality sound fills the air, over 200 channels of entertainment at your fingertips. Digital cable, it's the best choice in entertainment anywhere. Call 1-800-OK Cable now for a $9.95 connection. And only digital cable offers brand new features like movies on demand, order in an instant, rewind, pause and fast forward, with no extra equipment to buy and no contract.
1-800-PET-MEDS
Where do you get your pets flea, tick and heartworm medications? 1-800-PET-MEDS guarantees the lowest price on all your pets medications. Order now and receive free shipping. Call 1-800-PET-MEDS.
3Com
Nearly twenty years ago, 3Com Corporation launched a new industry by developing the first technology for networking personal computers. Today, 3Com is a company that maintains its leadership role with innovative solutions spanning the scope of communications. From the global enterprise to the neighborhood business, from the Internet point of presence to the home office, 3Com systems and products put computing resources within easy reach of millions of users worldwide. 3Com combines cutting edge research and development with world-class manufacturing facilities, and international service and support.
beta prostate
Stay tuned for a nationwide giveaway announcement.
Are you a man who’s waking up at night again and again to use the bathroom? If you’ve got this problem, we’ve got your solution: doctor-recommended Beta Prostate. Beta Prostate is made with 13 natural ingredients that target your prostate. Imagine: quicker bathroom trips, better relief, and a full night’s sleep. Best of all you can try Beta Prostate FREE, during a nationwide giveaway. Over 4-million bottles of Beta Prostate have already been shipped. If you’re ready to spend less time in the bathroom . . . and get a good night’s sleep . . . call now. Claim your free bottle before time runs out. And as an extra bonus, get our men’s libido formula . . . to support better intimacy for both you and her. It’s yours absolutely free. Just cover the shipping and handling. Call now for details
ANNOUNCER Just call1-800-452-1774. 1-800-452-1774. 1-800-452-1774
Podcast/Show
Don't Sweat The Small Stuff
One of my favorite posters says, "Life is a test. It is only a test. Had this been a real life, you would have been instructed where to go and what to do." Whenever I think of this humorous bit of wisdom, it reminds me to not take my life so seriously. And in the next hour, I'll help you learn how to not take your life so seriously as well.
A & E’s Ancient Mysteries
Be it endless fascination with the Bible, or chilling tales of Gothic horror, man has been compelled by the wonders of the unknown since the beginning of time. From the possible existence of Big Foot to the grips of a mummy’s curse. Uncover the truth behind “Ancient Mysteries” tonight on Channel 4...NBC.
Politics
Ben Carson for President
Dr. Ben Carson has been well-known for years as a world-class surgeon, serving at Johns Hopkins Hospital as head of pediatric neurosurgery. On February 7, 2013 he became known for the first time as a rising star in conservative politics. That was the day when he spoke at the National Prayer Breakfast, eloquently expressing his conservative ideals as President Barack Obama watched from only feet away.
Since his groundbreaking speech at the National Prayer Breakfast, Dr. Carson has continued to rise in popularity among conservatives and many have speculated about whether he will run for President.
In his CPAC speech on March 16, 2013, Carson discussed the hypothetical situation in which voters “magically put me in the White House.” He also announced that he will retire from his medical career at the end of 2013, explaining that, “I want to quit while I’m at the top of my game, and there are so many more things that could be done.” His retirement obviously would free him up to pursue political office.
Days later, he told the New York Times that he would consider public service under the right circumstances: “[I]f a year-and-a-half went by and there was no one on the scene and people are still clamoring, I would have to take [running for President] into consideration…”
There appears to be a real chance that Ben Carson will run for President. He is singularly qualified to succeed as a conservative, Christian Presidential candidate for the following reasons:
Public Service Announcement (PSA)
Above the Influence (PSA)
I thought I respected myself. That is, until I saw myself get high. It's just an ugly side of myself that I didn't recognize. Saying and doing things that just weren't me. I do respect myself, that's why I don't do drugs.
1. High Pass Filter: The engineer suggests adding a High Pass Filter to each and every mic.
2. Cuts vs Boosts: He said you'll get a lot more fidelity if you cut the unpleasant frequencies (freeqs) instead of boosting the parts you like. Notes:
Even the bass drum can have a High Pass Filter but set it lower, around 30-50 Hz.
It's okay to boost here and there, but there should be more cutting than boosting. Listen for things bleeding through, or things conflicting with each other, or ringing.
An Audio Mixer defined: "The Artist bakes the cake and the Audio Mixer serves the cake."
Day two was more practice than talk. We spent several hours taking prerecorded drums from Protools and playing them back through the board separated by channel. I personally used the Interactive Frequency Chart to play with accenting key frequencies within different drum parts. I went more dramatic than I would probably go in a real setting, but it was fun to play with for effect and learning.
Marcus Finnie was the drummer who played for our recording. He was awesome!
!!! NOTE about EQ !!!
The less EQ the better in most instances. If you have the right mic, in the right mic placement first, you won't need to do as much EQ. Every time you mess with EQ the sound will be colored, becoming less what it naturally is. In some cases you need this, in some cases you may even want to do this creatively, but as a general rule of thumb, the less EQ the better.
There are, however, instances where EQ is serving to:
Solve problems in the room, (Phase Shift, Cancellations, Combining, and Standing Wave issues, and other things.)
Remove things that are NOT natural to the instrument. For example, much of the lowest end of the audible range, 50 Hz and below is really noise created by things that are not musical. You could easily, in most instances, bypass the 50 Hz and above on all channels and not loose anything in the performance or sound, and quite possible gain clarity for those sounds that ARE musical living close to this lowest range.
The following are generic principles, guidelines. They are not hard and fast rules. You may find that your style of music or creativity demand that you break these rules and go another direction. That's awesome! These are just meant to help guide if you don't know where to start with certain things, or provide insight or ideas to spur your creativity.
DRUMS:
Kick Drum:
If you are using two mics, one in and one out, the inner mic is the more important one. The out mic could be used to pick up nothing but the 50-80-100 Hz band just to add some whompf to the kick.
No need to gate the kick. Just use a Blanket/Pillow/Muffle barely touching the front and read heads. This will subdue any ring and make gating unnecessary. Often an SM91/SM92 would be a good fit for the Kick mic. If your drum has no back head, or has no hole in the back head play with mic placement until you get the sound you want. When mixed with the band it should be fine.
Tambourine:
The Tambourine serves as an accent to the snare in many modern performances. If you stereo adjust these through panning and level together you will find that the Tambourine does for the snare what the bass does for the kick, it lets it live a bit more and sustains that sound a moment longer.
Bottom Snare Mic:
Like the tambourine, the bottom snare mic is best used, usually, as an accent to the snare sound. You could hi pass all way up to the high end range 1kHz and above, maybe even 6-7 kHz and above-but listen by ear, so that all it's doing is picking up the rattle of the snare on the head.
Inner Snare Mic:
A rare, but really intriguing option, is a THIRD snare mic INSIDE the snare. This can only be achieved by using a microphone small enough to fit inside the air hole, maybe a countryman lapel/headset mic. Using rubber bands you could suspend the Countryman inside the snare smack center of the drum, center of the heads, and center between the heads, perfect center.
You would typically NOT have this mic on at all times. You would simply have this as an optional third snare channel and you would turn it up on SLOW/LOW ballads where a cross stick is being used and the snare is barely being tapped. It provides a new, interesting, sound that the top and bottom mic don't quite provide.
Get that slider turned down instantly if the drummer picks up volume thought, because you could easily overpower the snare sound with this approach. Could be fun to play with though!
Snare:
Ring in the snare MAY be wanted by certain musicians or certain musical styles. However in most modern music the ring is unwanted. Several "tricks" are used to tone down or eliminate this ring WITHOUT having to resort to EQ, losing some of the natural sound. They are:
A little Duck Tape on the top head to the on two or four of the sides, but in places that you would not strike the drum.
Old Drum Head cut into a thin circle and simply laid over the top head.
A few Cotton Balls inside the snare drum.
A Thicker weight bottom head so that they (top/bottom) don't resonate at the same frequency.
There may be other things to try as well.
Toms:
There is usually no need to PUSH the toms volume up during a series of rolls despite the fact that most Audio Mixers feel the urge to do so. If you have a good drummer he's going to be using dynamics of his own to create the feel he wants with these rolls and you could be altering his dynamics.
Buford used the SM98 Small Condenser on the Hi Toms, and KSM28 wide diaphragm on the low tom(s) for the drum recording we used to practice on.
Hi Hat and Ride:
Hi Hat and Ride are both Rhythym pieces and should be present in the mix. If you are going to go to the trouble of micing the individual toms and snare, you should be micing the hi hat and ride individually too. Hi Hat - can be mic'd with one or two mics, like the snare. Some ways you could set this up would be:
Aim the top mic over the hi hat from above, angled down at 45 or 90 degree angle pointed toward the center or center edge of the Hi Hat.
Aim the mic directly at the Hi Hat, parallel to the cymbal, but slightly above the cymbal plane, so as not to catch the wind gusts from the cymbal as it closes.
Aim the bottom mic up at an angle 45-90 degrees
Aim the Bottom mic straight up, 180 degrees to the cymbal.
Any of these options, or other arrangements could be interesting.
Ride - this is often done best with a condenser mic, like an SM81. The idea is to pick up on the loud and soft hits as this often establishes the grove of a particular song.
Overheads VS Cymbal Mics:
There are two different approaches used in micing the top end of the drum. One may serve you better than the other, or a combination of both can be useful. But there is a difference.
Overhead Mics:
These are meant to pick up the WHOLE kit, not just the cymbals. Either one or more mics can be placed several feet above the drum kit. They are intended to pick up the entire kit.
Use 1: as a Supplement.
The individual mics are used to get the sound you want from each piece, but then the overheads are brought in to "fill out" the sound of the kit, picking up on subtleties and how the kit pieces play off of each other.
Use 2: as Primary
The over head is actually the primary mic, taking in the WHOLE kit, and then piece mics are added in to fill out the sound from the overhead. This is another great way to use an overhead.
Cymbal Mics:
These are meant to be piece mics. Each mic would be aimed as a specific cymbal, not the cymbals are a whole. If you have three crashes, on hi hat, and one ride, each would have it's own mic and be hi passed way up the scale to block out non-cymbal sounds.
This provides a crystal clear representation of the cymbal sound you are looking for to complete the pitches that give a true representation of the drum kit.
In our recording example in class, Buford used a KS32 very close to the cymbal and hi passed it really high up the scale.
Drums Overall:
Just as three notes make a chord drums
are a sonic mixture. Lows, Mids, and Highs are presented by the various
components of the drum. Kick, Toms hi to low, Cymbals, Snare Drum, Snare
Rattle... they all make up the overall sound.
Therefore,
if you drive the Kick and Snare to establish rhythm but fail to bring in
the Hi-Hat and/or Ride you are MISSING important pieces of the overall
drum sound. Many times we allow the cymbals, even the important rhythm
of Hi Hat and Ride, to be missing, lower, or buried by the other parts.
This does a disservice to the sound of the kit.
Make sure to give proper attention to the high end pieces, especially the rhythm establishing Hi Hat and Ride.
The
kick should not be louder than the snare, hi hat, or ride. They need to
balance t produce the right sound. This is a pitch based instrument.
Having the kick turned louder than the rest is like having one key on
the piano, or one string on a guitar set to be louder than the rest,
this isn't proper and ultimately does a disservice to the sound of the
kit.
Hybrid Approach:
In a pinch, or due to budget concerns, you could mix and match these techniques to achieve what you want. In fact, some recording artists, especially when they want an old rock sound, like old Beatles music, could use ONE mic for the whole drum kit, and simply EQ adjust for the sound they want. So there are no hard and fast rules, but the most tools you have to work with the more selective you can be on any given song, especially if you are doing things live.
Drum Kit Accent Points
From the Interactive Frequency Chart I figured these are the key points to play with when tuning EQ for Drums.
Kick
Punch - 50-100 Hz
Fullness - 100-250 Hz
Attack - 3 kHz -5 kHz
Snare
Ringing (Typically Unwanted) ~~ 900 Hz
Fullness - 120-240 Hz
Attack - 2.5 kHz - 5 kHz
Snap - ~~ > 10 kHz
Floor Toms
Fullness - 80-120 Hz
Attack - ~5 kHz
Rack Toms
Fullness - 240 - 400 Hz
Attack - 5 kHz -7 kHz
Cymbals of any kind
Clang - 200 Hz
Presence - 3 kHz
Shimmer - ~~ > 12 kHz
Gate Toms just enough to kill the ring, caused by vibration of the toms due to movement from the other kit pieces. Barely enough is better than too much with the gate. It's better to let some bleed through than not have the gate open with a soft hit/roll.
Gate with Snare and Kick could be done, but it's probably better to deal with bleed or ring through mic positioning and other tricks, as noted above. Gate on Snare and Kick will often cause an unnatural sound and your often just better off without it, unless you are dealing with a more than average bleed/ring issue.
Mixing in Surround was one of Buford's favorite things to do. There were multiple ways to set up the system, but typically you still rely on your front Left and Right speaker arrays and subs (either L/R or In Line Array) as your main point of reference for the sound.
From here there have been several arrangements he's used.
In any Surround system you wouldn't use the extra speakers at ALL times. You use these to accent. You still have primary sound coming from the front mains. You will create sizzle or excitement by adding in extras through this side/rear speakers. You add some echo or delay, sound effects, special solos, etc. Add as it fits. These speakers are not used to represent all sound at all times. In fact, there will be moments that no sound it coming from these extra sound sources.
Some uses:
echo, delay, reverb, or other effects
the sound of an airplane rotating through the audience around, panning with a joystick through each speaker, fading into one and out of the other. This gives the feeling of an airplane flying around the auditorium.
Same rotating done with a Sax Solo holding a long note, can be a very cool effect.
Stereo Mixing
Stereo Mixing still involves just the Front Left and Right mains, but uses creative Panning to make room for the various sounds to live and breath.
Pan: Pan can be used HEAVILY to create a stereo image of the sound present. If all the sounds are equal in Right and Left main the frequencies will compete and step on each other. You'll always be feeling like something is missing or too loud.
Stereo Mixing creates a place for each thing to live. As a general rule, but just a guideline, start by panning visually. If something if on your right, pan it to the right some. Very few things should live in the center, but very few things need to live HARD right/left either. You are moving things off to one side or another. Visually/Image perception will be that if a person is playing on the far right of the stage, the sound will be coming from 60-80% more from that side.
Mixing by Color is another way to view things. Imagine there are colors, maybe even use colored markers to write in the name of each instrument channel. Back Ground Vocals(BGVs) (all of them) in one color, Lead Vocals in another color, drum kit in a color, Electric Guitars in a color, Accoustic Guitars and Steal Guitars (if playing country) in a color, Organ would be it's own color (because it has a distinctly different sound from Piano/Keys which would get their own color.
You then mix by color. Make sure that each color is represented and heard. If something is missing... check your colors. Is there not enough yellow, blue... etc. It's a neat visualization, especially when dealing with large bands and complex music.
Example of Stereo Mixing:
Imagine you have: Acoustic Guitar, 2 Electric Guitars, Piano, Keys, Organ, Strings (Violin/Cello Etc), Drum Kit, Percussion Kit, Steal Guitar. Also you have Background Vocals, Choir, and One Lead Vocal.
Input Channel the Bass Guitar as channel one, Kick as channel two. They ought to live and work together, but each have their own space.
Hi Pass the Bass maybe to 50 Hz and the Kick to 70-80 Hz. Or Visa Versa. This allows one to live where the other is not?
Bass, Kick, Snare and Lead are Pan Center.
Hi Hat and Acoustic Guitar are both High Frequency Percussive Instruments.
Hi Hat maybe off to one side just off center
Acoustic Guitar off to the other side just off center.
In this way they carve out their own living space in the Stereo Field.
Steal Guitar with tucked up under the Acoustic Guitar.
You might pan Electric One and Electric Two just off to one side opposite eachother. Maybe E1 a little left and E2 a little right, in this way they almost feel as though they bounce off of eachother, rather than compete for the same sonic space.
Organs and Strings have a very complimentary feel.
You might place the String Section panned across one side
Then place Piano and Keys and Organ panned out over the other side
Hi Pass vocals maybe as high as 120-500 Hz depending on the vocalist. Get rid of noise that isn't musical or natural to that voice. If you can hi pass monitor mixes for vocals seperate from front of house, you may choose to hi pass MUCH higher on vocals in the monitor because the monitor is more about "Pitch" than tonal quality and they will hear pitch much better without low end clutter interfering.
Ride the Vocals. Keep bringing in and out the BGV's to support the Lead. Often you don't need to turn up the lead if you simply duck down the BGV's.
Ride the Lead too. Pull the lead in and out of the total mix, and in and out of the BGV mix depending on the feel and effect of the song.
Volume/SPL
This principle of bringing things down to highlight other things would apply to overall system levels as well. Attempt to leave head room. Not only head room in your board so that it's not clipping, but head room in your SPL dBu using a DB meter. If you are starting things at 90 SPL dBu than you only have until your cut off, decided by your leadership, usually 104 SPL dBu in Church settings. Start things with a lower range, maybe 70 SPL dBu. Give yourself room for dynamics and build.
Buford's Example: One Venue the powers that be required they keep the rock show to some bizzare low number, like 78 SPL dBu.
He made changes to cut down stage volume because it was throwing down more than 78 SPL by itself without help from the board.
Once that was complete he worked all the input gains and system levels to bring the overall SPL down.
He eventually did get things very close to their requirements. He said it felt awful at first to him, having listened at louder levels. But the audience gave more positive feedback during that show than any other before or after that tour. They were able to actually hear finer details that would have been drowned out at higher SPL.
This is not to say you can't get loud, it's to say that when you do it should be something you build to and something you do on purpose for dynamic, not a place you live from beginning to end.
Here are some facts about dB Meter Scales: Click Here
Here are some great resources to learn about protecting your ears.
An Audio Mixer defined: "The Artist bakes the cake and the Audio Mixer serves the cake."
Board Recordings
If you set your gain structure right, start with a room that has been EQ set with a Flat Frequency Response, and balance your levels right, you should try doing board recordings Post Fader. If done right, the board recording should sound essentially the same in the room played back on CD as it did played like (minus room noise from on stage items). If you adjust a guitar up on a solo, or bring the drum kit down a little during a quieter moment, these need to be reflected in your board recordings. It's an excellent way to develop a relationship between the band and the mixer, who is really more a part of the band than any other tech person present.
Sound Mixer vs Sound Engineer
Many times, due to budget, these are the same person. But they are very different roles and when budget allows should be two different people with different skills set specialties.
Sound System Engineer, or System Engineer, sets up the equipment and tunes the system. This person would be basically be the scientist or "engineer" of the group. He/She is going to know the power, amp, wattage requirements of the system and be able to ensure that the facility is equipped with what is needed. For large systems they may need several patches on the breaker board just dedicated to the sound system. The larger the system, and more subs, the more wattage needed. They also would check to make sure the system electrical is being grounded correctly with no ground loops (which create 60 Hz hums in the equipment). This person would also know things like weight ratios and weight capacities for hanging speakers from the ceiling baffles. This person would be responsible for calculating the Ohms needed for the system and setting up in Loudspeakers and other equipment in Series/Parallel formations to create the right Ohms outcome.
Mix Engineer, or Mixer, or Sound Board Mixer, deals with the music. The mixer is a band member, just as much or more than a technician. Often Buford would right with the "techies" on the first trip in the tour, get to know his crew and make sure they know his needs and requirements. But from then on he spent most of his time with the band and artist. Everything on stage passes through him and it's his job to make sure that it doesn't get lost in translation. Artistic needs, who needs to be higher, lower, effects, placement in the mix, any changes the band is making based on past performances, this all needs to be passing through him. The mixer is an artist too and must bring his thinking to that level. He can't just turn on the system and set levels and then watch, he must play with the band.
The Mixer as Band Member.
The Mixer ought to be just as involved in the music the band produces as any other band member, they ought to know how to break down the construct of a song, know the bridge from the chorus, and know what parts need to shine before they come up and prepare for them. This level of knowledge can also help when doing creative EQ or Effects.
For this reason, when budget allows, the Mixer shouldn't be showing up much earlier than the band themselves. They should be there a few minutes early to make sure everything is clean and ready, line checks are complete, and the system kinks are ironed out. But the majority of the Mixer's mental energy should be spent creatively with the band.
You must learn to PLAY the music just like a band member. If you get buried in technicals you might miss the music and risk actually stepping on the band's performance with your own head buried in the board.
Mixer style and ability is more important than the console itself. A great mixer on a poor console can still do great things, a poor mixer on a great console will still likely create a hot mess. This also means you must rely on the people you have. If you have the technical knowledge to be a System Engineer but you are the Mix Engineer you need to rely on your people. Get to know what they can and can't do. Once you know they can do it, let them and get back to the artistry of your mix.
Would you want your Chef as your server or would you prefer for him to concentrate on making great food and let the server bring it? Let your chefs do their work and you work on serving it.
How to get started in Sound:
What kinds of things can you do to get started in a sound career?
Local Venues, bars, nightclubs, churches, maybe even hotels.
Rental Equipment businesses
Personal Recording Studios.
Seminars
Books, Magazines, Internet Tutorials
Education - Audio AND Music Education.
Know how to break down a song, know what instruments should sound like.
Keep Learning....
System Tuning
Flat System Frequency Response!!!!
Many, if not most, of the audio systems in the world are tuned with some boost or cut in levels to create a good "room sound". More often than not it has a boost in the sub ranges (below 100 Hz). They do this to create a deep bass feel to the room. This is completely wrong for mixing Live Sound. Now, if you want to tune a car stereo or home sound system to the preferences of the listeners there, great. But in a live sound room you should not be boosting or cutting you should be starting with a FLAT response. Why?
An artist should start with a clean pallet. Is this to say that should not ever be any Bass Boost? No. It is to say that the boost or cut decisions should be made by the mixer at the board for each channel, not the system tuner. It's also WAY easier for the system to be tuned when you are not prematurely coloring the sound.
Any changes, boosts, cuts, compression, limiting, gates should be set by the Mixer on the board (and outboard tools) and should be made purposefully to suite the situation. By tuning the system to a Flat System Frequency Response, using Pink Noise and tools to read the room. The System Graphic EQ should be fairly flat with minor adjustments to make the Loudspeakers produce the flattest frequency response in the room that it possible can.
So, the whole thing is sounding a little flat, missing some bottom end? Well fine, go to your kick drum and boost 60-100Hz with a wide bell and see how that feels. Now boost some of the Bass Guitar. Is that better? do it at the board, not on the system itself. Let these be creative decision by the mixer, not pre built into the system by the engineer.
What are some of the ramifications of pre-tuning the system to the room? It will create bad live recordings, it will usually equal undesirable sound when piped into aux sends, like mothers rooms, hallways, and overflow rooms. It will create bass boost across the board, rather than the exact places you need it, so the entire mix becomes in danger of being muddy or swamped. By boosting only those instruments, mics, or channels that need the boost you preserve the clean pure sound you need to create a lively and authentic mix. It's not that there shouldn't be a boost, it's just that that boost should be made by the artist controlling the board.
Tuning a system designed for live audio, with anything other than Flat Frequency Response, is like an artist buying a canvass that has been pre-colored with blue on the top half and green on the bottom half. It might be a good starting place for an amateur, but no professional artist wants to be told what colors and hues they must use.
When tuning a system Buford will always use Pink Noise, he may also then turn to a High Quality recorded speaking voice, and then to a high quality musical set, typically a full band with brass and steal and all because it covers the frequency range. The two MP3's that he plays (Spoken and Band) are the same ones every time. This is because you must know what they OUGHT to sound like to make sure the system is tuned right.
The idea on Flat System Tuning is that if you put in "A" you get "A" out of the Loudspeakers. In a non-linear, non flat system, you put in "A" and you get "A+b+c-d*z..." out often times. It's hard to know what you are dealing with.
SUBS
Subs on separate Aux Sub Sends are a great idea! Here are some thoughts that make this work best. The system should be set up so that all frequencies 20Hz to 20kHz are being sent to the full range Loudspeaker system before calculating the subs in. So you shouldn't drop the subs and be "missing" frequencies, even though the Full Range Loudspeakers may not be producing "much" of the lower end, there should be some there. I should be able to play the Bass Guitar and Kick through the Main System and hear all of the corresponding frequencies.
Now the subs are crossed over to only receive frequencies below your target, maybe below 200 Hz or even below 100 Hz on a well tuned professional system. These subs are sent to a separate Aux Send or Mono Send. The subs are then brought up and down throughout the performance as needed, not left on at all times mindlessly. They are used as "Accents" if you will. This may differ in different types of music of course. A very bass heavy music style may require that the subs be driven constantly, but that is a stylistic choice made by the artist and mixer, not one that applies to all sound, all music, all styles.
End Fire Arrays for Subs are becoming quite popular and are actually much more effective than the traditional set up of having two subs off to the Right and Left. The R/L set up for Subs creates phase issues and often creates a tunnel in the middle of the room where the subs seem to drop out and then become more present in the sides. By setting up subs in a short End Fire Array you can actually create better coverage, creating a bubble of sub sound emanating from front center everywhere in the room, rather than two bubbles from the side competing in the middle. The End Fire array requires that the front speakers be time delayed to arrive at the same time as the rear speakers. This way both sound waves hit at the same time. Any time two similar waves arrive in time they serve to amplify (produce a large amplitude). You actually get more sub sound with less power out of this set up than you could full power with a R/L set up.
Another interesting trick is essentially turning the subs into a cardioid pattern response. To do this you could have one rear facing and two front facing to create backwards phase cancellation so that the entire sound of the subs points forward and non is lost into the stage. Typically subs have an omni response pattern, meaning they tend to be heard everywhere (behind, side, front) equally. This creates a cardioid response and directs all that energy into the audience, without overwhelming them from the sides.
The End Fire Array uses less energy, less decibels produced from the speakers directly and more sound coverage. The old adage "Smarter not harder" seems to come to mind here. Mixing the End Fire Array with a Rear Facing Delay Array could be a match made in heaven.
Side Note: with subs there is no need to boost any one channel into the subs more than another. In other words, don't boost subs at the Aux Level. If you are wanting more bottom end, make that adjustment at the channel EQ level and let it ride to through the cross overs to the subs. All the Aux Sends for the sub should be at unity.
SPL
Sound Pressure Levels. Louder is not always better. drop the SPL (overall system volume) and balance the mix and eq better. A great mix, as with great music, will be dynamic. It will have highs, lows, subtle, powerful, etc. Powerful is NOT equal to painful and fatiguing. Even in the hardest rock shows the listener should not leave hearing fatigued or with hearing damage (permanent or temporary). If you listen to something that is too loud, or even just one particular frequency that is too loud, the ear will begin to shut that off and you'll "feel" like you need more. The louder you get the worse it is for the hearer. Any audio person using ear plugs because it's too loud but "that's they way they like it" just doesn't know how to balance the audio mix.
Faders: Learn to pull the faders BACK DOWN. If you boosted a guitar for a solo and it's over pull it back down. Many just keep pushing faders higher and higher. To make up for the guitar that was boosted everything else gets boosted now. Pull Back! You feel like you need more Bass? Rather than pushing up the bass maybe we could cut some piano, kick, or guitar and make room for it. Many times cutting something that is competing will have the audible effect of raising the thing you thought was missing. You also may find that starting out the entire set at a lower SPL and working up and down throughout the performance creates dynamic. It also gives you fatigue headroom for the final push when you "end with a bang"!
independentrecording.net
Use EQ to cut out things you don't need. Very few frequencies below 50 Hz have any musicality in them. They are most the result of noise (system, electronics, feet stomping, something banging, etc) then music. Try putting a high pass at 50 Hz and above on everything, yes even the Kick and Bass. You can even clean up the bass and kick as individuals by High Passing the kick at 60-70 Hz and the Bass at 50 Hz. The bass have more musical tones than the kick, so let it carry the lowest place in the mix. High pass vocals at 100-200 Hz. Low Pass the kick down to 5-8kHz. Boost some of the EQ range 100 Hz-250 Hz for "Fullness" and 3 kHz-5 kHz for "Attack". You could lower or completely cut everything around these ranges if you wanted to "Make Room" for other things to live in this space. You High Pass and Low Pass cut the ends off so if you have a four band Parametric EQ you can use your two middle options to take out the middle and give other things some breathing room. Use this AWESOME interactive EQ Chart for other instrument specific EQ ranges so that you can target your EQ. Ideally in a quiet room, enclosed drummer cage, off stage guitar amps, 100% In Ear monitors, etc... you shouldn't need to do a TON of cutting and boosting, just accent or de accent certain areas. But if you are in a VERY live room with lots of bleed you may have more creative cutting and boosting to create a product that "works" in the room.
EQ not SPL. Also keep in mind that sometimes a listener fatigue or "hey that's too loud" could be coming from a specific frequency being amplified through standing waves or constructive interference and not the overall SPL. Check EQ settings before just pulling the volume down. Or pull the volume back for a moment and check eq settings and then pull it back up if you found a problem elsewhere.
Dynamics are important. The mixer ought to be making constant adjustments. Just as guitarist doesn't play a song with just one chord, never moving his/her hand, so a mixer ought never be idle during a musical performance. The faders are the strings and they ought to be played musically with the band throughout the performance. Anticipate that lead vocal and have them shine through the chorus and then pull him/her back through the verses, or the other way around, if the lead is singing solo during verses and backed up by the other sings during chorus than push the lead during the verse and pull them back into the vocal mix during the chorus. Be ready to bring that solo guitarist up a bit during the solo but back into the mix during the rest of the set. Use background vocals (BGV's) to support the lead, without overpowering them.
Audience Levels. If the audience gets too loud (yelling screaming, etc), many audio mixers will pull up the volume and compete with the audience, who then gets louder and so forth. Don't compete with the audience. They got excited, but if you pull up the SPL and they quiet down it will be TOO LOUD. Let them have their moment and then let them listen. When they realize they can't hear they'll pull themselves back. Obviously take this in stride, if they are constantly louder you could push it up a little, but find a good balance and let them do some of the work of choosing to hear too.
VCA (Voltage Control Actuators).
VCA's (DCA Digital Control Actuators on Digital Boards) can be a great tool when they are available. They are different from Subgroups in several ways, but one main way for our purposes. VCA's are like remote controls. No Audio Signal is passing through them they are simply remote controlling the other channels levels. By grouping things through VCA's you can control the overall system levels. You can essentially leave the main outs at unity and never touch them again. You don't need mutes, in fact mutes are dangerous because you may forget to turn them back on/off. By pulling all VCA faders to ZERO you essentially muted the system if all channels are routed through VCA's. They give you control without adding system noise or other unwanted effects that sub groups can cause.
Clarity
As odd as it sounds to me, effects can actually help gain clarity in some cases. Adding some Chorus to Voices or Harmonizer to Bass Guitar can create electronic constructive interference without actually turning up those channels any louder.
Other tools like Compressors and Limiters, (which are essentially the same thing with different ratio settings) can help bring the dynamic of the music under control. If you have a bassist who is really soft and then really hard placing some hard compression on him so that he's always under compression will allow the soft parts to be heard without overloading the hard parts. Compressors also add their own color to the sound dynamics which can be quite pleasant as well. You don't want to compress so much that the instrument or channels looses all it's dynamic range, but you want to find that happy balance between dynamic range and overloading the rest of the band during heavier parts. If you are to err, err on the side of too much, not too little compression. Especially for Kick, Bass, and Vocals. For that matter compress everything if you can. Use make up gain after compression so that you don't loose too much overall signal. This can keep the dynamics of the band in check but still allow it to breath.
If you know your band or musical style well, you could probably set attack and release times before the band arrives and then dial in the threshold when they start to play. If you have the tools for it, you can side chain the Kick and Bass. Side Chaining essentially lowers one piece through compression while the other is on and then raise up when the other stops. For example, you could side chain the Bass and Kick. When the Kick Hits the Bass is compressed more than normal for those milliseconds, then comes back in when the Kick Signal is released. This opens a hole for the Kick to Live and then the Bass becomes the sustain of the Kick. They breath together.
Drummers: Gates most often should be used on Tom's only. A Gate keeps a mic channel muted until there is enough signal coming into that mic to cause it to turn on. The idea of the Gate on toms is that the sounds of the other pieces of the kit being played are not bleeding into the tom mics and increasing overall drum noise when they are not being played. If the gate is set correctly it should turn on when they are hit and then turn right back off when the sound is over. If set too high you risk cutting the tom sound short or not having it turn on at all if played too lightly. I'd err on too little gate rather than too much.
Monitors: if you are not entirely on in ear monitors high pass the vocals upwards of 200-300 Hz in the monitors. These ranges are not needed for pitch which is the main point of the monitors, and the high pass will prevent any competing bass from covering the much needed pitch or with audience hearing. Bass has a tendency to kill mids and highs, overpowering them. If you are able to bypass those frequencies in the monitors you will have more clarity on stage for the singers.
Side Note Verbal Communication with Mixer: If you are able to be open and honest tell the producer to provide feedback before or after the show but NOT during. Just like you wouldn't go to a Guitarist in the middle of a set on stage and start telling him to change how he's playing, you don't do that to the Sound Mixer either. He/She needs to be focused on the music. Provide feedback before and/or after, unless it's urgent. If you must come to the Mixer during a show, speak in a normal speaking voice to the plate just behind the ear. DO NOT YELL into anyone ear, this can cause damage to their hearing and it could hurt.
Volume: Get your stage volume down as low and clean as you can before working on house volume.
PAN and Instrument Marking:
A general rule of thumb with stereo mixing is to "Pan as you see it". If the guitar 1 is off to your right and guitar 2 is off to your left add some panning those directions. Very few things will ever be hard panned left and right, subtle pan to move the item in your stereo field. If you keyboardist is giving you two stereo inputs and they are on your left side of the stage, pan the left hard left and the right to 11 oclock. THis puts the keyboardist in the stereo field where they ought to be.
Color each instrument differently so that you don't really need to read labels in the dark just see the colors. Label them with words too, but use colored pens on white marking tape. This makes it easier to see.
Effects
Effects can serve to widen the space. Reverbs can be set as three pre-sets. Slow (3 Seconds), Medium (2 Seconds), Fast (1.2 Seconds). This way you can simply hit one button each song to get where you want to be for that songs reverb needs. If something sounds hollow or thin, sometimes just adding some reverb will serve to fill out that space, the same way a shower room serves to fill out the voice, which is why so many people sing in the shower or bathroom.
Sound Check
Have a talk back mic for YOURSELF to talk to the band on stage during sound check and rehearsal. It might even be good to be in the ear of the talk back band member if they have one, which most professional bands will now. Even if you don't use it during performance, it'll be handy during sound check and rehearsal going both ways. Set the Band first.
Start with drummer, and make sure all the mics are working for you correctly. Add the bassist and make sure they are working together and not stepping on each other. Set a hi pass on both at about 50Hz to remove low end clutter. Attempt to play with them based on your style of music. For most music (rock, country, pop, etc) you could add some boost in the 100Hz range for the kick and lower the bass in that same region, then to the opposite in the 200-250Hz range. Lower the kick and raise the bass. This will give them both a place to live. Don't cut the lower one, just lower it.
Add the rest of the band and make sure everything is working in your stereo field. Other than Lead Vocals, Bass, Kick, and Snare you probably don't need anything else down the center of your stereo field. You can use creative panning and EQ to make sure each has it's own place. Even the drum mics can be panned across the field so as the drummer walks through toms and cymbals they crawl across your face/room.
Set the Vocals next.
MUTE the band. Get the Lead vocal sounding right. Add in the back ground vocals and mix them as a group, lead just on top, but not way on top. It might even be helpful to have the background vocals set to one VCA and the lead to another. Then ride the lead bringing the lead up and down between chorus/verses. When vocals check their mics do NOT have them say "Check,1,2,3" this is not an accurate reading for singers. Have them sing part of the songs they will be preforming that night and do it with as much energy as they'll be using later. You know secretly that they will always be lower in volume early on in the check and they'll warm up with the audience energy, but this will still give you a better reading that Check-1-2-3.
Mix them back together and make sure it all works cohesively. Make any adjustments as needed.
Other thoughts
Use Mics that have good rejection and/or isolation depending on what you need.
It's more important to have a good mic with live sound to have good rejection and mic placement. You can EQ things after you deal with having the right mics and mic placement.
Listening at LOW Sound Pressure Levels you can hear things that you don't hear at high spl. If you can listen remotely and here something at low spl that needs to be fixed, it'll make you full volume mix sound that much better.
You MIX is musical and shouldn't change from room to room. Your EQ or adjustments may change based on how the room reacts, but how loud your lead guitar is in relationship to your mix during a lead solo shouldn't change from room to room. Keep your EQ Room adjustments and your Musical Mix as two separate things in your mind. Ultimately if you've turned your room to Flat Frequency Response than you should have to worry about any room to room adjustments on your board much at all.
That is DAY ONE... notes from DAY TWO are forthcoming.
Electromagnets are the basis for microphones and loudspeakers and many other devices we use in audio. Excess electrons also escape power chords and end up in mic cables which is why you should try to run your power chords separate from mic cables and not side by side. Here is an interesting study of electromagnets.
In any Sound Reinforcement System there are many complicated ways to hook up a sound system and layers and layers of products you can learn about. The better you understand these things the better you will be able to set up a system to optimize the room. However, the basics are the basics. ALL the complicated systems in the world boil down to multiple connections of the basic things.
There are three categories of things to consider in a basic sound system.
Inputs
Devices that put sound signals INTO the system.
Ex: Microphones, DI Boxes, Pickups
Signal Processors
Devices that process the sound signals.
They may lower the amplitude, raise the amplitude, or add alterations to the signal itself.
Devices that deliver the sound back into the environment to the human ear.
Ex: Loudspeakers of various kinds.
Bonus Category - Delivery System
Things that carry sound signals.
Ex: Cables and Connectors
Transducersare devices that convert one kind of signal into another kind. In the case of Audio Engineering the signal is converted from audible sound pressure into electronic signal. It literally turns the sound pressure waves into their electrical voltage representation and then back into audible sound pressure again. Microphones and Pickups are transducers that turn sound pressure into electrical voltage. Loudspeakers are transducers that turn electrical voltage back into sound pressure.
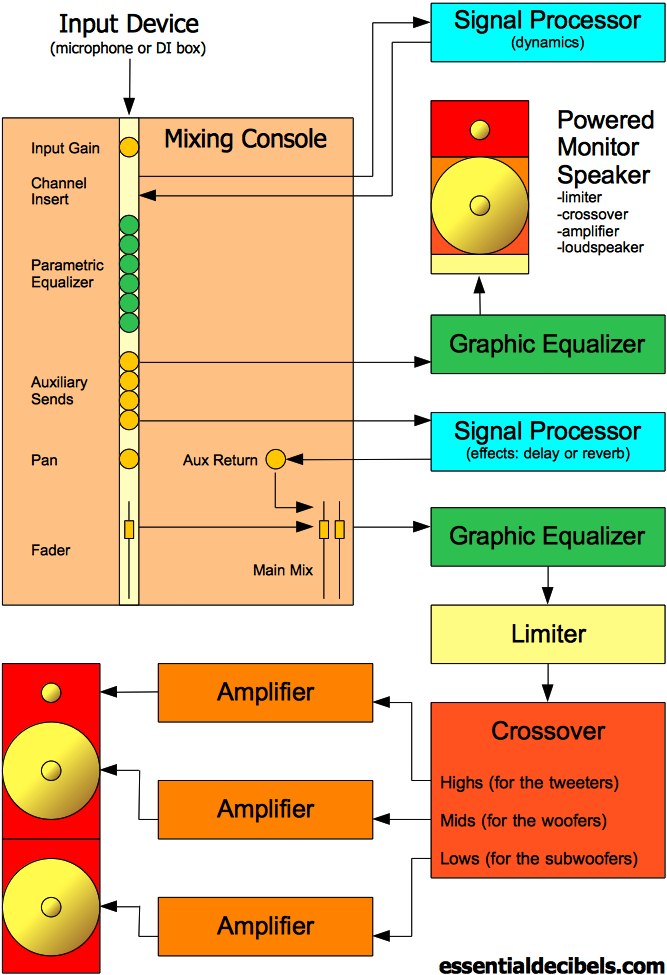
The tool that gets the most attention on a day to day basis. Although there are many things you can do in the set up of your system, the Console is where you will spend most of your time. Microphones, DI boxes, and other inputs head into the board, sometimes assisted by a preamplifier to get the signal strong enough for the board to use, through a snake. That snake in analogue systems is comprised of a whole bunch of chords that are linked directly to each input. That snake in modern digital systems is often a simple Cat5(or6) cable.
After arriving at the Console the input signal strength can be adjusted up or down. Each input channel has adjustments that can be made to the incoming signal before it is passed through to the outgoing flow into the speakers. The MIXING CONSOLE allows adjustments to be made to the signal for either scientific or artistic reasons to make the sound pleasant to the hearers in the audience.
The first adjustment on the board channel is the GAIN (also known as Pot or Trim although these can mean different things too). If the signal is not strong enough it can be "gained" up and if it is too strong it can be "gained" down. This allows the operator to have a "usable signal", which is one that can be adjusted through other means and sent off to places it needs to go. Many times these adjustments can cause the outgoing signal to be stronger or weaker than the input signal so the gain must be adjusted to accommodate. Related to gain may be a small button that says "PAD" followed by a number (-15 or-20, etc). This button when activated will decrease the incoming signal strength by a dBu. PAD-15 will decrease the signal by 15 dBu. This is helpful when the incoming signal is so strong that the gain knob doesn't allow you to get a usable signal by simply turning it down.
The first EQ adjustment is often a High Pass and/or Low Pass filter. A HIGH Pass filter could also be called a LOW Cut filter. It prevents lower frequencies from coming through and allows higher ones to pass through. A LOW PASS filter could also be called a HIGH Cut filter. It allows signals lower than chosen to pass through but prevents anything higher. Much of the signal below or above a certain range is barely audible and may not even be musical. For example, especially with low frequencies, the frequency may be coming through as noise introduced to the system from electrical connections or nearby instruments or other inputs foreign to the actual things being mic'd. Electrical interference, from free electrons jumping wires into the Mic cables will produce a hum at 50-60 Hz, because the frequency of electricity in the USA operates at this frequency. So by putting a High Pass and setting it above 60 Hz you bypass this problem even if it is present in the originating signal. Often seen as simply HP/LP.
Other EQ functions will allow you to make adjustments to more specific frequencies, for example: Lowering a chosen frequency (say 250 Hz, 1 kHz, 8 kHz) while leaving those above and below it in tact. There could be up to three sets of adjusters. The following explanation is based on a decently expensive board that has all the right tools.
dBu: There is one adjuster that will turn up/down that frequency. This will be the one present even if the other two are not. In the event that it is the only selector possible, this will usually be a fixed point in the frequency range. (Which means that if you want to duck/cut down a little of 800 Hz and all you have is a knob that gives you 1000 Hz and 500 Hz you'll have to decide which one or a mix of both, works better).
Hz: There is another button that allows you to select the specific frequency to be adjusted. So if you need to duck that 800 Hz you can dial it over to 800 Hz and be more specific with your adjustments.
Bell: This is the lease likely to be present, but helpful when it is. The Bell allows you to choose how narrow or wide the selection is. Without the bell adjustment the chosen frequency, when adjusted, will impact the others around it as well (which you may want, or may not want). By narrowing the bell you are able to pick a specific problem without taking out things you do want. Or you can boost a specific thing you want to add flavor, say the attack of the beater on a kick drum or attack of the symbol, without boosting other things you didn't want inside.
Aux's
Another path is the auxiliary. The most layman way to say this is that Aux's create sub copies of signals and send them other places, other than the main outs to the speakers. You can often select whether this Aux will be sent prior to or after the EQ adjustments have been made and/or prior to or after the adjustments of the slider. The "Aux Send" may be sent to the hallway speakers, the mothers room, the band monitors, the recorder, or other places the signal is needed besides the main speakers. The other uses for Aux Sends might be to take a copy of the signal and change it somehow, compression, effects, etc, and then feed them back into the board through the same or different channel, often through an "Effects Return" or "Aux Return".
Similar but not the same is an "Insert". The insert actually takes the signal away from the board, adds some prepossessing to it, and then feeds it back into the board to complete it's journey at the same point you interrupted it. This signal, for example, but have effects or compression or other things added to it, BEFORE you add your EQ and adjustments. This may be what you need and may not, so think through what you want and then decide if an Aux or Insert works better for your application.
PAN
PAN typically just means sending it to the right or left or a mix of both. If you turn the PAN knob to the left half way, but not all the way, you are sending MORE signal to the left then right by that much. On smaller boards this can be used to determine Busses or Subgroups as well.
PAN can be used creatively to create stereo imaging. Seeing PAN used by Buford Jones at an Audio Seminar I took recently opened my eyes to the possibilities of PAN. There is every reason to use the PAN selectively on nearly every channel. Nearly none of the PAN selectors ought to be straight up for most inputs. Moving sound around the room opens up room for other sound in different parts of your audible perception. Kick, Bass, Snare and Lead Vocal ought to be straight down the middle, nearly everything else can be PAN'd to it's appropriate place, typically as it stands visually.
At the same time you don't PAN everything hard right or left either. You choose degrees. If you are getting a stereo input from a keyboard, and the keyboard is on your far left. Try panning the left hard left and the right just left of center. If you have a variety of cymbal mics and tom mics, pan them each left to right, or right to left, from each other as they stand visually. This was when a tom walk down occurs the sound moves across your face.
You can also PAN things together.
Snare and Tambourine serve the same (similar) function musically. Pan them both center. Place the volume of the snare where you want it, and then bring up the Tambourine until you feel it adding to the snare without overpowering it.
Acoustic Guitar and Organs/Pianos can play well off each other. Pan them both opposite each other and similar volume, try panning them the same, see what hears/feels right.
Basically think of the entire piece musically and see what things work together
Side Note: Buford typically puts the BASS right next to the KICK on the board since they serve a symbiotic relationship to each other.
Outward Bound:
From this point you will find things are grouped, bussed, muted, fader-ed and that is all sent to the output. From the output they go to
Outboard Graphic Equalizer to set the room EQ. This EQ is often set up when the room is set up and never/hardly changed again, unless the room changes.
Limiters keep the signal from passing the safe zone and blowing the speakers or amplifiers.
Crossovers will break up this outgoing signal and send it to various specialized loudspeakers. The signal is most often broke up into two or three. Lows and High/Mids or Lowe, Mids, and Highs.
Amplifiers/Line Drivers (amplifiers that drive the signal to the place it needs to be for the loudspeakers to produce them.
Loudspeakers produce the signal back into an audible sound pressure wave and send that to the audience.